Welcome to the Magus blogger template documentation!
Magus isn't your average template – it's all about speed, SEO mojo, AdSense compatibility, and rocking a sleek, minimalist vibe that screams pro and looks darn good. This step-by-step guide ensures a seamless installation, setup, and customization process for the Magus blogger template.
Let's dive in! 🚀
📥 Download: Magus Professional Magazine Blogger Template
1. Installation
📝 Please refer to our detailed guide: How to Install Blogger Template
2. Site Settings
Customize your site feed preferences, enable lazy load & WebP images, set up a high-resolution favicon, and site cover.
2.1. Site Feed
- Go to Blogger dashbaord > Settings
- Find Site feed section
- Click on the Allow blog feed and choose Full
- Save

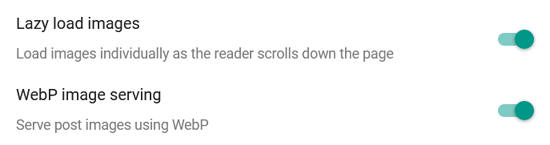
2.2. LazyLoad & WebP Images
- Go to Blogger dashbaord > Settings
- Find Posts section
- Toggle to enable Lazyload and Webp Images
2.3. Favicon & Site Cover
- Go to Blogger dashbaord > Themes
- Locate the Customization button and click on the down arrow
- Find the b:skin section in the HTML editor
- Locate the code below and insert your favicon and cover image URL in the value parameter.

3. Customization
Easily customize background, colors, fonts, layout, fixed header, boxed mode, sticky sidebar, and more.
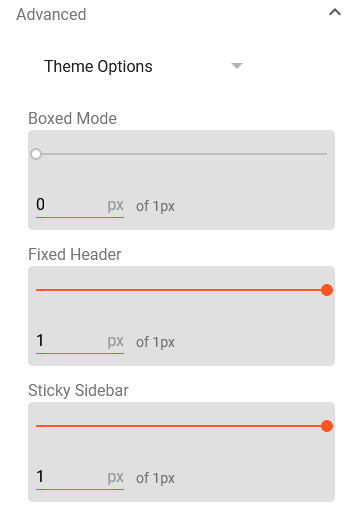
3.1. Theme Options
- Go to Blogger dashbaord > Themes
- Click on the Customization button
- Under Advanced, click on Theme Options
- Enable or disable each available features by adjusting their values.
- Save.
3.2. Colors and Fonts
- Go to Blogger dashbaord > Themes
- Click on the Customization button
- Under Advanced, click on Theme Colors or Theme Fonts
- Now, customize the colors and fonts you like.
- Save.

4. Topbar
Add quick links and social media icons in the topbar for an enhanced user experience.
4.1. Page Links
- Go to your Blogger dashboard > Layout.
- Locate the Topbar Menu section > click on the edit icon
- Add, remove, or modify links as needed.
- Save to apply the changes.

4.2. Social Media Icons
Supported Icons: https://icons.getbootstrap.com
- Go to your Blogger dashboard > Layout
- Locate the Topbar Social section > click on the edit icon
- Add, remove, or modify social links as needed.
- Save to apply the changes.
Please do not delete or relocate the shortcode; it's crucial for displaying icons on your blog.
5. Header
Add your brand logo, setup site menu, and implement dropdown or mega dropdown options in your site's header.
5.1. Site Logo
- Go to Layout
- Locate Site Logo section and click on the edit icon
- Upload your site logo using the available options.
- Put your site dark logo image URL in the link field. (Premium)
- Save to apply the changes.
![]()
5.2. Dropdown Menu
- Go to Layout
- Locate Site Menu section and click on the edit icon
- Submenu Item: Add one underscore(_) before the link name.
- Submenu of a Submenu: Add two underscore(__) before the link name.

5.3. Mega Dropdown
To create a mega dropdown, use the following shortcode in the URL field:
Shortcode[getMega label="recent"]

6. Ticker
Display scrolling updates or announcements for dynamic and engaging content delivery.
- Go to Layout
- Locate Ticker section and click on the edit icon
- Use the following shortcode in the content area.
- Save.
Shortcode[getTicker results="5" label="recent"]

7. Featured Posts
Enhance your homepage with stylish featured posts widget, designed to highlight handpicked articles or showcase the latest updates.
- Go to Layout
- Locate Featured Posts section and click on the edit icon
- Use the following shortcode in the content area.
- Save.
Shortcode[getFeatured label="recent"]

8. Ajax Blocks
Enhance your site's appeal with unlimited stylish blocks and showcase your content like a pro!
- Go to Layout
- Locate Ajax Blocks 1 or Ajax Blocks 2 section
- Click on the Add a Gadget and add HTML/JavaScript widget
- Use the following shortcode in the content area.
- Save.
Available block types: block1, block2, grid1, grid2, column1, column2, list1, videos
Shortcode[getWidget results="5" label="recent" type="block1"]

9. Main Posts
Let's customize recent posts on the homepage, author profiles, comment systems, social shares, and other available options for a personalized touch.
- Go to Layout
- Locate Main Posts section and click on the edit icon
- Customize settings as needed.
- Save.

9.1. Comments Plugin
Magus offers three comment systems – Blogger, Disqus, and Facebook. To set up your favorite one, choose the shortcode of your preferred comment system from below:
For Blogger:
Shortcode[type="blogger"]
For Disqus:
Shortcode[type="disqus" shortname="DISQUS_SHORTNAME"]
The `shortname` parameter is optional, but you can customize it with your own Disqus shortname.
For Facebook:
Shortcode[type="facebook" lang="LANGUAGE_CODE"]
Supported Language: en_US, es_ES, ar_AR, id_ID, th_TH, vi_VN, pt_BR, fr_FR, ru_RU, de_DE, it_IT
Official Site: https://developers.facebook.com/docs/plugins/comments#language
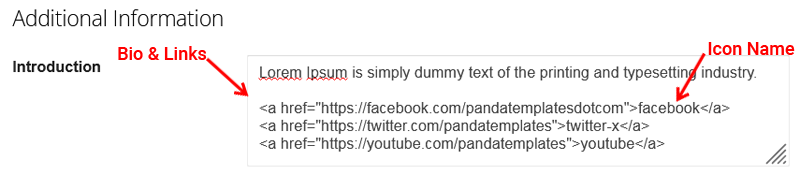
9.2. Author Profile
The author profile widget automatically populates with your Blogger profile information if your profile is set to public.
- Go to https://www.blogger.com/edit-profile.g
- Find Additional Information > Introduction
- Write you bio.
- If you want to show your social media links, use the following HTML structure.
- Click on the Save Profile button to update your profile.
Supported Icons: https://icons.getbootstrap.com
HTML<a href="#">Icon_Name</a>
10. Sidebar
Personalize your blog's sidebar by adding an email newsletter, social counter, ajax widgets, advertisements and more.
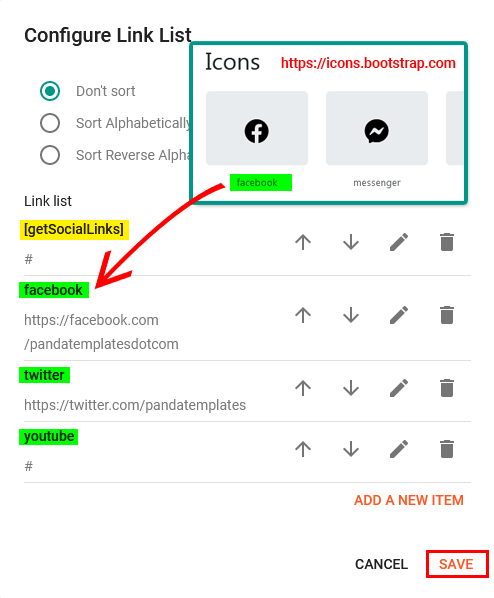
10.1. Social Counter
- Go to Layout
- Locate Sidebar section
- Click on Add a Gadget and add LinkList widget
- Add the following shortcode first:
[getSocialLinks] - Now, add your social links, and include
#your_textat the end for custom display text with icons. - Save to apply changes.
Please do not delete or relocate the shortcode; it's crucial for displaying icons on your blog.

10.2. Email Newsletter
- Go to Layout
- Locate Sidebar section
- Click on Add a Gadget and add HTML/JavaScript widget
- Add the following shortcode in the title field.
- Write your descriptive text in the content area to encourage readers to subscribe to your newsletter.
- Save to apply changes.
Shortcode[getNewsletter title="Weekly Newsletter"]

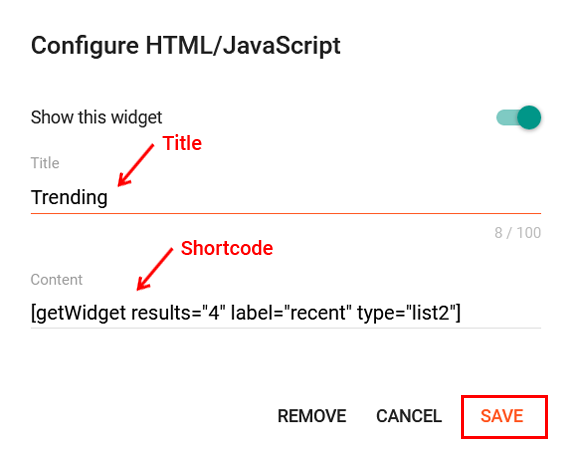
6.3. Ajax Widgets
- Go to Layout
- Locate Sidebar section
- Click on Add a Gadget and add HTML/JavaScript widget
- Use the following shortcode in the content area. Customize label if you want to show posts from a specific label.
- Save.
Shortcode[getWidget results="5" label="recent" type="list2"]
6.4. Recent Comments
- Go to Layout
- Locate Sidebar section
- Click on Add a Gadget and add HTML/JavaScript widget
- Paste following shortcode in the content area.
- Save.
Shortcode[getWidget results="5" type="comments"]

11. Footer
You can add unlimited widgets and social media icons on your blog's footer to make your site more professional.
- Go to Layout
- Locate Footer Left, Footer Center or Footer Right section.
- Click on Add a Gadget and add gadgets as needed.
- Save to apply changes.
11.1. Social Icons
Supported Icons: https://icons.bootstrap.com
- Add LinkList gadget
- Add the following shortcode first:
[getSocialLinks] - Now, add your social profile links
- Save.
Please do not delete or relocate the shortcode; it's crucial for displaying icons on your blog.
12. Footer Credits Pro Only
Refine your site's branding with custom footer credits for a professional touch.
- Go to Layout
- Locate Footer Credits section and click on the edit icon
- Add your credits or links using the appropriate HTML tags in the content area.
- Save.

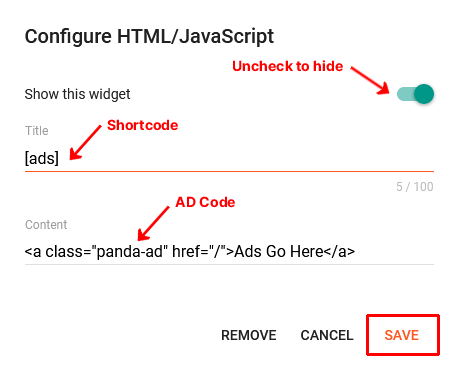
13. Advertisement
Boost your blog's earnings by smartly positioning ads and enjoy the flexibility to add unlimited ads.
- Go to your Blogger dashboard > Layout
- Locate the following sections where you want to display advertisement:
- Header Banner
- Homepage Ads
- Ajax Blocks 1/2
- Post Before Ad
- Post After Ad
- Sidebar
- Footer Banner
- Click on the Add a Gadget
- Choose AdSense or HTML/JavaScript or Image widget
- Paste the ad code obtained from your ad network or custom ad into the provided content area of the choosen widget.
- Save to apply changes.
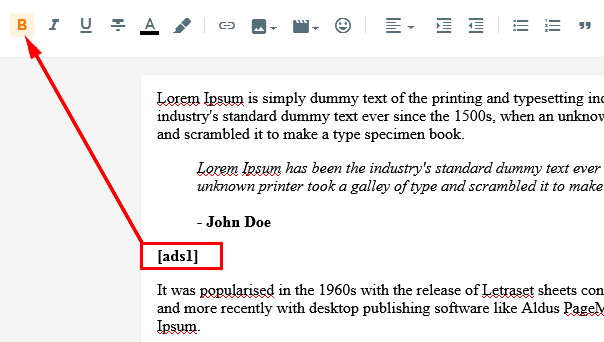
13.1. Move Ads
- Go to Posts
- Choose any post where you want to move ads
- Make sure you're in Compose view mode to access the visual editor
- Use
[ads1]to place the first ad at your desired location. - Use
[ads2]to place the second ad at your desired location. - Publish or Update your post.
Must apply bold style to the shortcode on your post.
14. Advance Features
Please refer to our detailed guides to learn how to utilize these features in your blog posts or pages.
14.1. Contact Form: How to Add Contact Form in Blogger
14.2. Table of Contents: How to Add Buttons in Your Blogger Posts
14.4. Alert Messages: How to Add Table of Contents in Blogger
14.5. Codebox: How to Add Codebox in Blogger
14.6. Post/Page Layout: How to Change Layout of Post/Page in Blogger